Labor Scheduler is a tool that allows you to build weekly schedules, print, share and compare scheduled labor against projected sales
- Managers can print the schedule and shift cards even if the schedule is not posted.
- Managers can click at a given time on Daily View and add a 2-hour shift where they clicked.
- Managers can click and add a shift and "drag and drop" the in and out times on the Daily View.
- Scheduled Overtime will now be accounted for properly in labor percentage calculations.
- If you are a Decision Logic Administrator and have not yet set up Labor Scheduler Maintenance, please navigate to Labor Scheduler Maintenance.
- If an employee has been assigned two job codes and you are only scheduled for one of those job codes in that week, you will report on both schedules. This was by design so that when looking at the schedule, the employee will not be accidentally double-booked.
For Example Jim has been given two job codes, one that is assigned to the FOH schedule and one that is assigned to the MGR schedule. Therefore his name shows on both the FOH and MGR schedule, even though he only has shifts scheduled for the Manager job for that week (which is assigned to the MGR Schedule).
Setting up Labor Scheduler
Navigate to Operations> Labor Scheduling> Labor Scheduler
Select the store that you want to work with. (If you are a store manager, your store should already be selected)![]()
Choose the Schedule that you want to work with using the Schedule menu on the left side of the page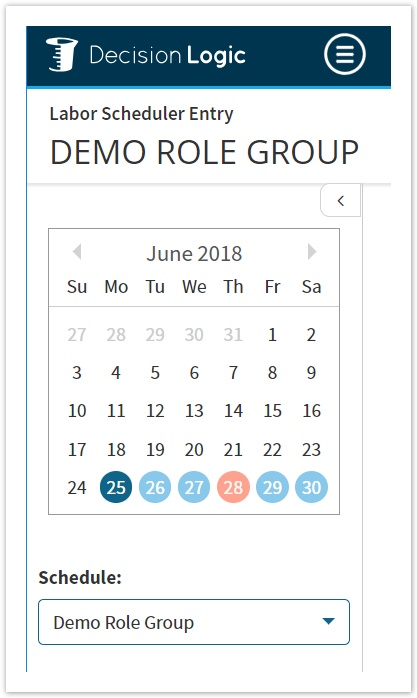
Choose the date range that you want to schedule
- Use the date picker on the left side of the page to choose the week that you want to schedule.
- When you first get to the Labor Scheduler page, the current week will be selected.
![]() Note, the blue highlighted week corresponds with your payroll week. The highlighted week is the same as the week displayed on the scheduler page.
Note, the blue highlighted week corresponds with your payroll week. The highlighted week is the same as the week displayed on the scheduler page.
![]() Note, the employees that are visible on the Schedule are based on the POS Job Codes that are assigned to each employee. For example, if your employee has the POS Job Code Server, then they will be on the Front Schedule because of the Job Role that contains Server is assigned to the Front Schedule. If the employee that you wish to work with is not on your schedule, please contact your Decision logic Administrator for assistance.
Note, the employees that are visible on the Schedule are based on the POS Job Codes that are assigned to each employee. For example, if your employee has the POS Job Code Server, then they will be on the Front Schedule because of the Job Role that contains Server is assigned to the Front Schedule. If the employee that you wish to work with is not on your schedule, please contact your Decision logic Administrator for assistance.
Table of Contents
| Table of Contents |
|---|
For additional questions or assistance please submit a support ticket by visiting the Decision Logic Help Center.
Availability
Please note the following indicators for availability:
Open Availability | Partial Availability | Approved Time Off Request |
|---|---|---|
 |  |
|

To update an employee's availability you will want to navigate to Operations> Labor Scheduling> Employee Availability and adjust their availability.
Employees can submit an availability change request to their managers by using the Employee Central Mobile application (available on the Google Play Store and the Apple App Store).
![]() Once a schedule has been posted, employees can no longer submit Time Off Requests for the dates included in the posted schedule, however, you can still edit the schedule.
Once a schedule has been posted, employees can no longer submit Time Off Requests for the dates included in the posted schedule, however, you can still edit the schedule.
Adding Shifts
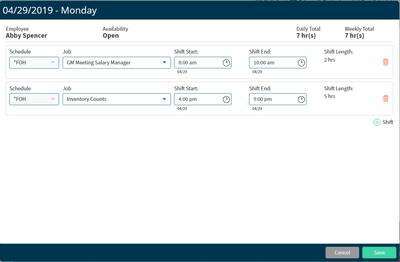
To add a Shift to your Schedule, select the day of the week for the employee that you want to work with and fill out the popup.
The Employee Schedule popup will indicate the following information:
- Employee Name
- Shift Date
- Shift Duration
Define the following:
- Shift Position (Job Role)
- Shift Begin Time
- Shift End Time
Select the Save button to add this shift to your schedule
Select + Shift to add more shifts for the employee

Once the shift is added, your schedule will update to include that shift on the week and day view

After adding a shift, the total hours scheduled will update in the Employee/Shifts column of the Labor Scheduler.
![]() Your employees are automatically sorted A → Z. To change the sort, click on the arrow in the EMPLOYEE / SHIFTS header and your employees will be sorted Z → A.
Your employees are automatically sorted A → Z. To change the sort, click on the arrow in the EMPLOYEE / SHIFTS header and your employees will be sorted Z → A.
Edit Shift
![]() On the daily view, you can edit a shift by using your mouse to drag the ends of the shift bar to adjust or expand the start and or stop time of the shift. You can click any given shift on Daily View and add a 2-hour shift where they clicked.
On the daily view, you can edit a shift by using your mouse to drag the ends of the shift bar to adjust or expand the start and or stop time of the shift. You can click any given shift on Daily View and add a 2-hour shift where they clicked.

To Edit a shift, select on the shift that you want to change and the Employee Schedule popup modal will appear.
You can do several things in this popup when editing:
- Change the Shift Position
- Change the Shift Begin Time
- Change the Shift End Time
Add a new shift, for when a split shift is needed.
Once you make the changes that you want, select the Save button and your schedule will be updated.

You can delete the Shift by clicking on the shift and clicking on the Delete Shift button.
You will be asked to confirm that you want to delete the shift before it is removed from the schedule.

Copy Shift
To Copy a shift, move the mouse over the shift that you want to copy, then select the Copy icon.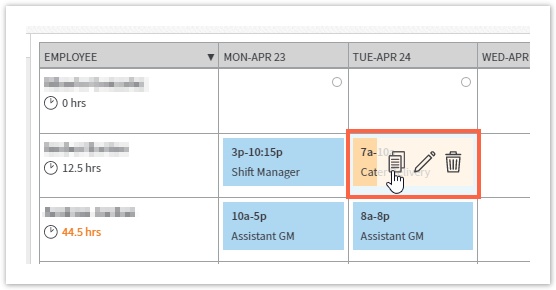
Select the day that you want to copy the shift to.
If you need to copy the shift to more than one day, select the next day that you want to copy to.
Then select Done in the bottom right-hand corner.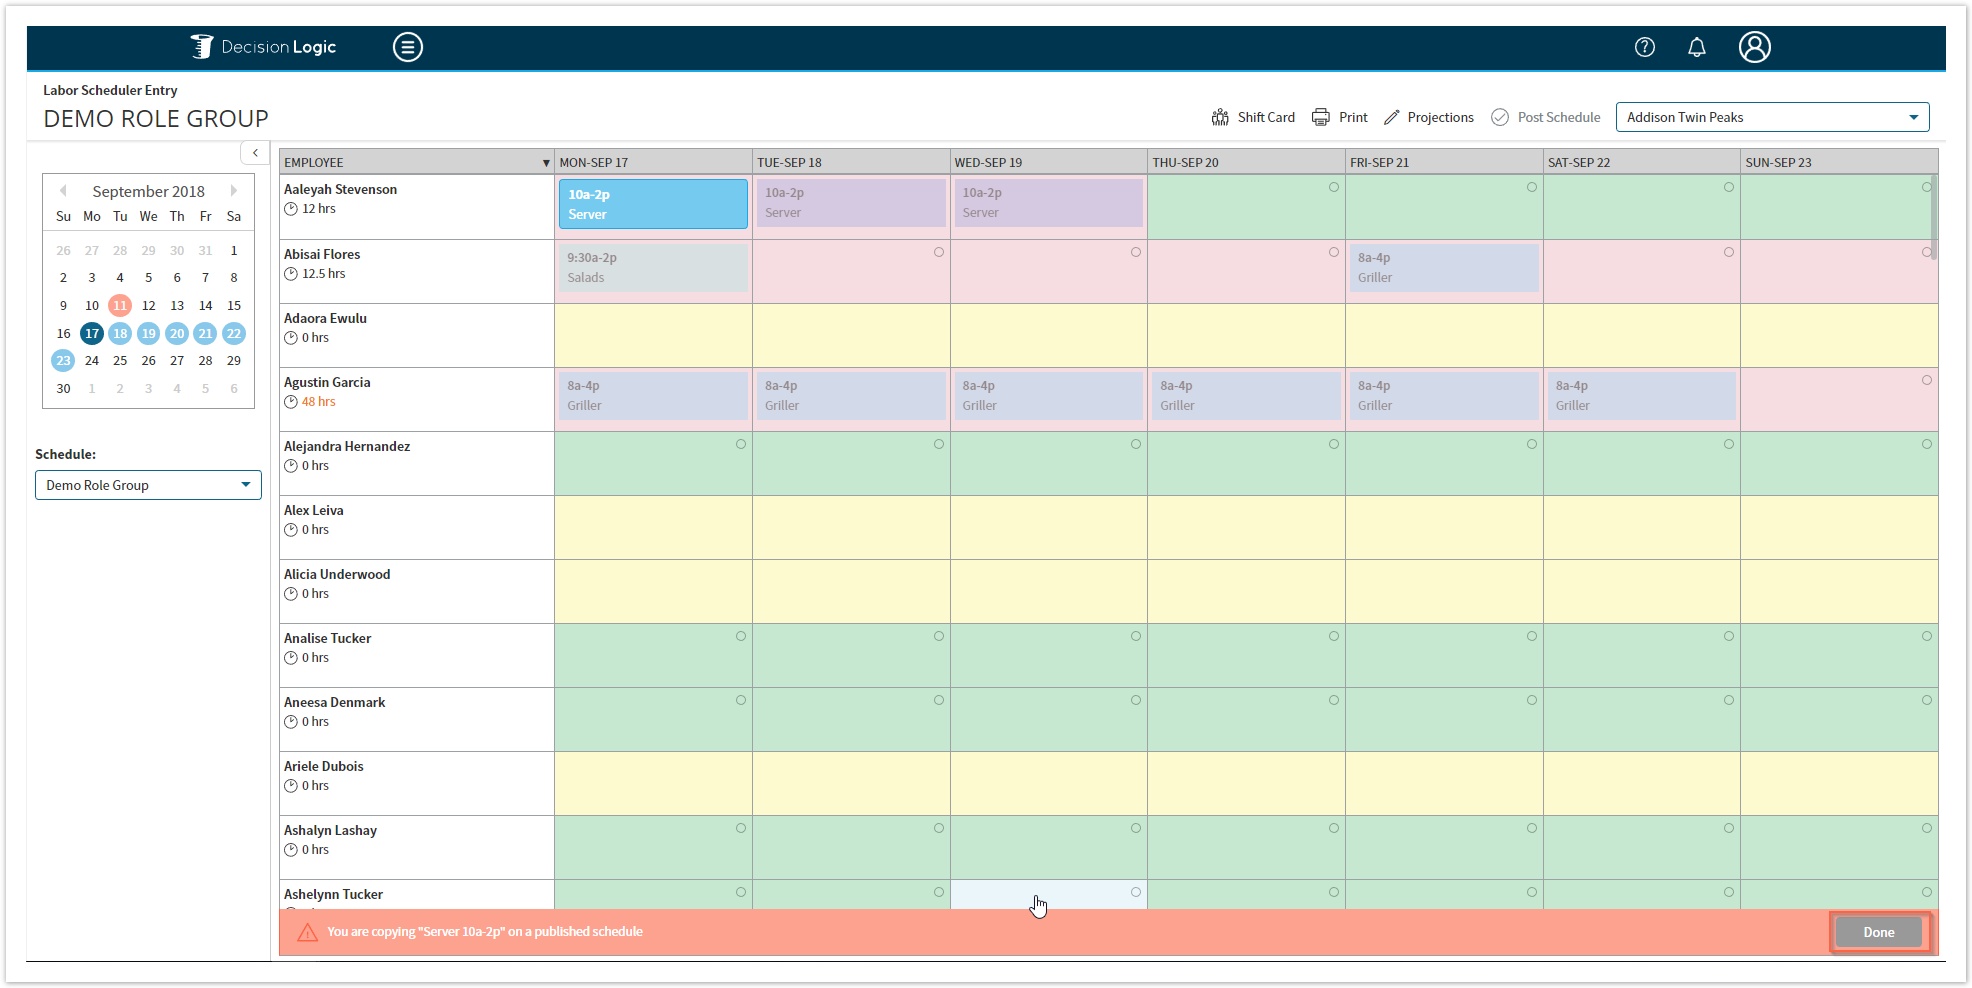
![]() Note that you can only copy shifts within the same employee.
Note that you can only copy shifts within the same employee.
![]() If you are copying a shift and click on an employee that is not the one you are copying from, the Add Shift window will appear.
If you are copying a shift and click on an employee that is not the one you are copying from, the Add Shift window will appear.
Daily View
- Select Day to schedule in day view

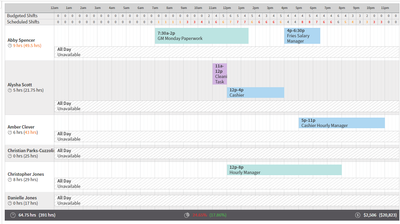
- View Budgeted compared to Scheduled in an hourly table within the Day View on the Labor Scheduler
- Budgeted totals reflect the number of shifts needed for this hourly segment based on Labor Templates Maintenance assigned to the Store you are viewing.

- View Scheduled Hours for the Day compared to the Total Scheduled for the Week
- View Labor % for the Day. The number next to the pie chart is for the day you are viewing. The number in parentheses is the Labor % averaged over the week.

![]() Note, On the template, if you specify the number of labor-hours you need for the segment. and Labor Scheduler> Daily schedule tells you how many shifts you should schedule for a segment.
Note, On the template, if you specify the number of labor-hours you need for the segment. and Labor Scheduler> Daily schedule tells you how many shifts you should schedule for a segment.
For Example
- The template says for the 7:00-7:30 segment if there are sales projected between $1 and $500, then schedule one labor-hour.
- The forecasted sales for 5/13 are $128, so the daily schedule says you need to schedule 2 of the 30m shifts to equal
= 1 labor-hour. - If the forecasted sales were $750, it would instead tell you to schedule 4 of the 30m shifts
= 2 labor hours (per the specification for 7:00-7:30 and $500-$1000)
![]() It is important to note that if you are viewing 30-minute increments and you need 1 hour of labor, it would take two people to fulfill that with 2 shifts on the schedule.
It is important to note that if you are viewing 30-minute increments and you need 1 hour of labor, it would take two people to fulfill that with 2 shifts on the schedule.
![]() The Budgeted Hours for a schedule processes the raw check start times for the calculation.
The Budgeted Hours for a schedule processes the raw check start times for the calculation.
Terminated Employees
If you have terminated an employee that is on the schedule when you hover over the ![]() you get the message 'employee has been terminated'
you get the message 'employee has been terminated'

Post the Schedule
When you begin a schedule, it is in a Draft state. The schedule will not be visible to employees until it is posted.
To post the schedule, click the Post Schedule button.
![]() You can print the schedule prior to the schedule being posted.
You can print the schedule prior to the schedule being posted.


Once a schedule has been posted, you are still able to edit shifts on that schedule, however, you will get alert saying:
![]() You are editing shifts on a published Schedule.
You are editing shifts on a published Schedule.
You can also add shifts and delete shifts from an edited schedule.
Printing
To Print your employee schedule, select the Print button near the store selector.
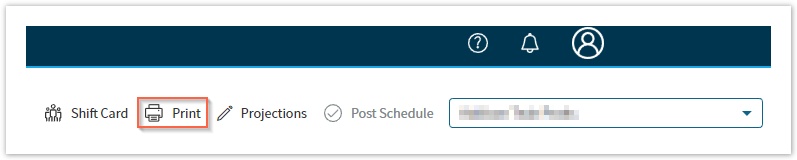
A browser popup will appear with printing options:
- Print to your printer
- Save as PDF
- Print in portrait or landscape mode
![]() Printing options will vary based on your browser. For even more options, we recommend saving as a PDF and printing using your PDF viewer.
Printing options will vary based on your browser. For even more options, we recommend saving as a PDF and printing using your PDF viewer.
![]() You can print the Shift Cards prior to the Schedule being posted. See Labor Scheduler: Shift Card for more Information.
You can print the Shift Cards prior to the Schedule being posted. See Labor Scheduler: Shift Card for more Information.
Projections
Projections are located at the bottom of the Labor Scheduler page, there is a Projected Labor section.- The first row shows Labor Hours as Percentage of Projected Sales.
- The percentage on the left is the Weekly Labor Hours as Percentage of Weekly Sales for the fiscal week selected.
- This is the sum of the wages represented in the schedule divided by the total projected sales for that fiscal week.

Daily Calculation | Weekly Calculation | |
|---|---|---|
Equation | Value of Hours Scheduled for the Day / Projected Sales= Percentage | Value of Hours Scheduled for the Week / Projected Sales for the Week= Percentage |
Example | $1,300 / $7,181 = 18.10% | $11,583 / $65,624 = 17.65% |

Metric | Calculation |
|---|---|
Projected Sales for the Day | SUM OF (Sales for the last 6 weeks of sales for that Day-of-Week) / |
Projected Sales for the Week | SUM OF (Projected Sales for Each Day of the Week) |
 Note, if you have any questions about the projected sales calculation, please contact your Account Manager or the Decision Logic Help Center.
 Note, if a location does not have any sales reporting under Last Years Sales and $0 Calculated Sales, refresh the page so that the page will populate and no longer error.
Color Indicators
The labor percentage values are color-coded red, white, or green.
Green means that Projected Labor is between 17% and 18%.
This is based on a target labor cost percentage of the sales.
The default target value is 18%.
Red means that Projected Labor is over the target of 18%.

Talk to your Account Manager, or contact the Decision Logic Helpdesk, to request a different default value for the target labor percentage. This can be done by submitting a support ticket with the help desk by visiting our Decision Logic Help Center.
Toggle Option
When changing the “All Schedules” toggle, the Schedule Sales amount should change based on how the activity-based scheduling was designed.
When you toggle “All Schedules” on, it returns the estimated sales from all departments.
When you toggle it off, it shows sales for all departments assigned to the schedule.
Activity-Based Scheduling gives managers the ability to base their labor % on projected sales for specific department sales per schedule.
For example, this would be useful if I am writing a BOH schedule and I want my projected sales to only reflect that of the Food department(s).Activity-Based Scheduling allows the manager more control in having the right people on staff for the right volume and sales that the area of the restaurant is going to produce.| Filter by label (Content by label) | ||||||
|---|---|---|---|---|---|---|
|