UDT Requirements for Decision Logic
This application is a windows service with a client interface. It will not interrupt POS services or functions
UDT Requirements for Decision Logic
Ensure the store is added in Decision Logic under Maintenance > Stores.
Contact helpdesk@decisionlogic.co
or call 888-358-7728 to coordinate installs with Decision Logic.
The helpdesk will provide unique numeric identifiers for StoreID and GUID for each store
needing to complete the
installation.
- Before running the install you must be logged into the main back office machine as a Windows Administrator User
- Download a 32 bit or 64-bit install package below under Installers
White list Firewall
White list theWhitelist Firewall
Whitelist the following for both inbound and outbound traffic
:
216.58.
288.1 through 216.58.228.63
mydlweb.com
You may need to
open Port 443 and 80 prior to making firewall adjustments.
Aloha users may also need
to allow
AlohaBasicLabor.exe
to be executed on their server where the UDT will pull from.
Framework
InstallInstall FULL
Microsoft.NET Framework 4 available here.
Table of Contents
| Table of Contents |
|---|
For additional questions or assistance, please submit a support ticket by visiting the Decision Logic Help Center.
All training videos are located in the Decision Logic Video Vault
UDT Client Install Manual
Wizard will notify when complete
Select close
Launching UDT Client and Sending Data
To launch UDT client, navigate to Knowledge Management Systems and launch UDT client one of three ways
- Windows Start Menu
- The UDT Client shortcut should be populated within the Windows Start menu under lists of programs in the Knowledge Management Systems folder.
- Desktop Shortcut
- Double click the UDT Client icon to launch the New UDT client.

- Double click the UDT Client icon to launch the New UDT client.
- Default Directory Location
- If the desktop shortcut does not exist locate the client by default directory location. C:\program files\knowledge management systems\udt client
- Double click UDTClient.exe to launch the client
- To create a new shortcut if it was somehow deleted from the desktop Right click UDTClient.exe, select create a shortcut, drag and drop that shortcut that is created to the desktop.
- Windows Start Menu
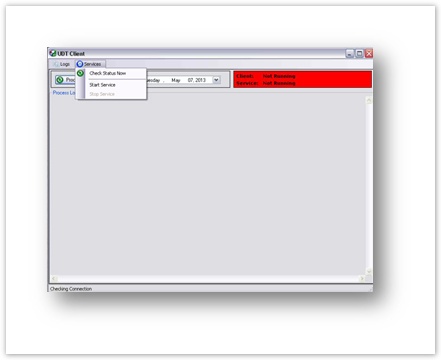
- Now that the client is running notice the status of the client and service.
- If the status is red this signifies the client is not running, manually start from services menu option in UDT CLIENT select Start Service.
- If the status is yellow this signifies the client is not running, manually start from services menu option in UDT CLIENT select stop service, then select start service.
- If the status is Green this signifies the client is running and ready to transmit data
- A validation may send and complete the task without processing. Notice the Process log will now contain task details.
- Select a run date via the date drop down. The current date is set by default.
- Select Process Now to transmit 3 days of historical Journal data and 7 days of historical labor data.
- Journal data consists of sales, comps, discounts, and payments.
- Labor data consists of summary labor hours.
- Place a check next to each task in order to transmit the data for that task.
- Select OK to begin processing

- The Process Log will indicate if the send was successful.
Data should appear on your dlweb.com website within 30 minutes of the successful send.
- If validation is not successful and unable to complete
- Navigate to Logs
- View today's Log file
- Send Logs to our Customer Support Portal
Installers
See this article toDownload UDT Program Installers
Open this article using the computer that runs your store’s Point of Sale system. This computer is usually located in the store’s office.
Click the appropriate download package from the options below.
Save the file to your Desktop.
64 Bit | 32 Bit | ||||||||
|---|---|---|---|---|---|---|---|---|---|
|
|
Windows Installs
Before running the install, you must be logged into the main back office machine as a Windows Administrator User.
Download a 32-bit or 64-bit install package under Installers.
How do I know which one to install?
| Expand | ||
|---|---|---|
| ||
|
| View file | ||||
|---|---|---|---|---|
|
| View file | ||||
|---|---|---|---|---|
|
Troubleshooting UDT
If you receive an Error Validating Store:
There are a few things that could cause this error. To determine where to start look for errors in UDTStoreTask.log.
a) The UDTClient service is running under an account that doesn't have Administrator privileges.
b) The date/time and/or daylight saving settings are incorrect on the machine.
c) The StoreID or StoreGUID in the configuration files are incorrect.
Verify that the user is able to hit https://tac2.mydlweb.com/UDTService/Service.svc from a browser.
There are too many edge-cases that come up for different customers but here are the more common errors that we come across.
Errors
Task completed in error - no log files found match
This usually means that the task is unable to locate/connect to the data source.
- Be sure that the RootDirectory value are correct in UDT Server Management.
- Look for errors in UDTStoreTask.log
- Debug task in Visual Studio
Fix the timezone in Aloha in d:\bootdrv\alohaqs\data
1. Delete the timezone.ini file in d:\bootdrv\alohaqs\data
2. Set the correct date, time and time zone in Windows
3. Restart the ctlsvr service
Aloha then builds a new timezone.ini file the d:\bootdrv
- Look for errors in UDTStoreTask.log
- Debug task in Visual Studio
- Look for errors in UDTStoreTask.log
- Debug task in Visual Studio
- Look for errors in UDTStoreTask.log
- Debug task in Visual Studio
Installation and Configuration
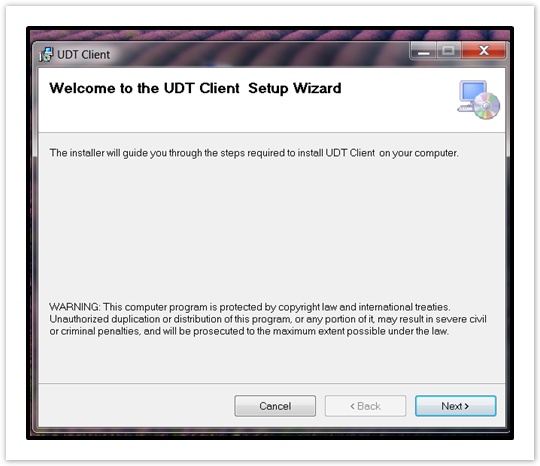
Double-click the icon to launch the Setup Wizard.

Click Next
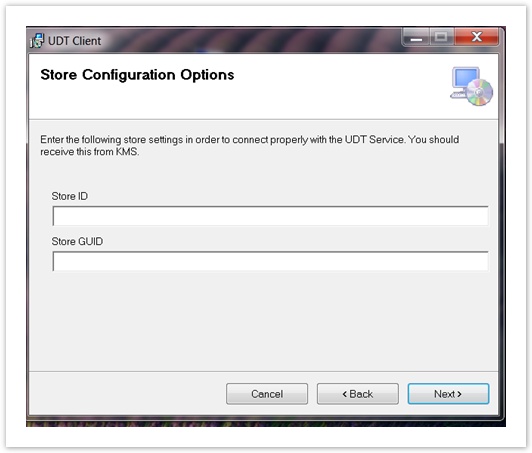
Enter the Store ID and Store GUID that your company’s Decision Logic Administrator provided you.
 It is easiest to open the email or message you received that contains these credentials on the same computer you are installing UDT on.
Copy the IDs and paste them into the appropriate fields. If you do not have these credentials, contact your company’s Decision Logic Administrator or submit a request with our Decision Logic Service Center.
Click Next
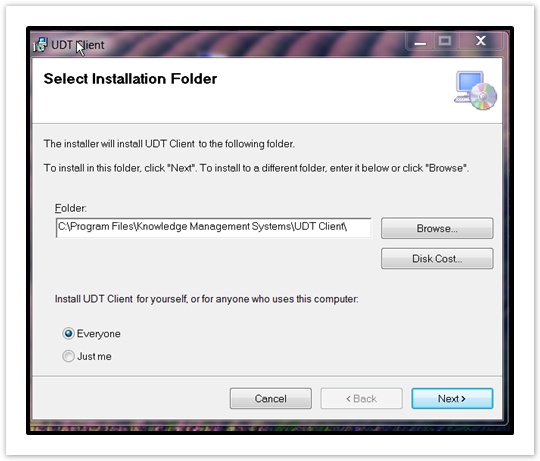
No changes are needed when Selecting the Installation Folder.
The default location is c:\programfiles\knowldege management systems\Udt Client Decision Logic also uses the company name Knowledge Management Systems (KMS)
Click Next to finish the installation.
The Wizard may take a few moments to complete.
Select Install for Everyone
| Tip |
|---|
The UDT Program is now installed and configured! Once the program is installed, you should expect to see Sales and Labor data in your site at the start of the next business day. |


How do I run Universal Data Transfer (UDT)?
The article How do I run Universal Data Transfer (UDT)? has a step-by-step guide.
The steps below are for the following Point of Sale systems:
Micros
Aloha
Hunger Rush
QuikServe
Launch
| Expand | ||
|---|---|---|
| ||
|
.png?version=1&modificationDate=1658871223023&cacheVersion=1&api=v2&width=102)
Run
| Expand | ||
|---|---|---|
| ||
|
© 2023 Knowledge Management Systems, LLC. Decision Logic. All Rights Reserved.
If you were unable to find a shortcut icon, you can create one!
In the folder that contains the program, right click UDTClient.exe
Select Create a Shortcut
Drag and drop that shortcut to where ever you want it.