This article provides Decision Logic Administrators and users with Line Check Maintenance ‘change’ permissions to create, define, and assign Line Checks.
Overview
Line checks ensure that restaurants follow safety protocols to prevent food-borne illness, cross-contamination, and a brand’s documented approach to full compliance toward food safety. Other examples for Line Check use are to confirm floors are mopped, equipment cleaned or stored correctly, etc. Store-level users can organize their assigned Line Check from sheet to shelf which allows store-specific setup.
Decision Logic Administrators can access the Line Check Maintenance page by navigating to:
Maintenance > Line Check > Line Check Maintenance.
The Line Check Maintenance home page displays:
All schedules that are created.
Time the line check is scheduled to be posted.
The number of items assigned to each line check.
Total stores assigned to each line check.

Table of Contents
| Table of Contents |
|---|
| Info |
|---|
For additional questions or assistance, please submit a support ticket by visiting the Decision Logic Service Center. |
Video
Watch this video to learn how Decision Logic Administrators maintain line checks.
| Widget Connector | ||||||||||
|---|---|---|---|---|---|---|---|---|---|---|
|
Create a New Line Check & Schedule
Users with Line Check Maintenance ‘change’ permissions can create line check schedules. Once a line check schedule is created, it cannot be deleted. However, you can add or remove stores to any line check schedule. Begin by navigating to:
Maintenance > Line Check > Line Check Maintenance
Click Schedule.

Name the Line Check.
Select a Check Time when entry should be posted.
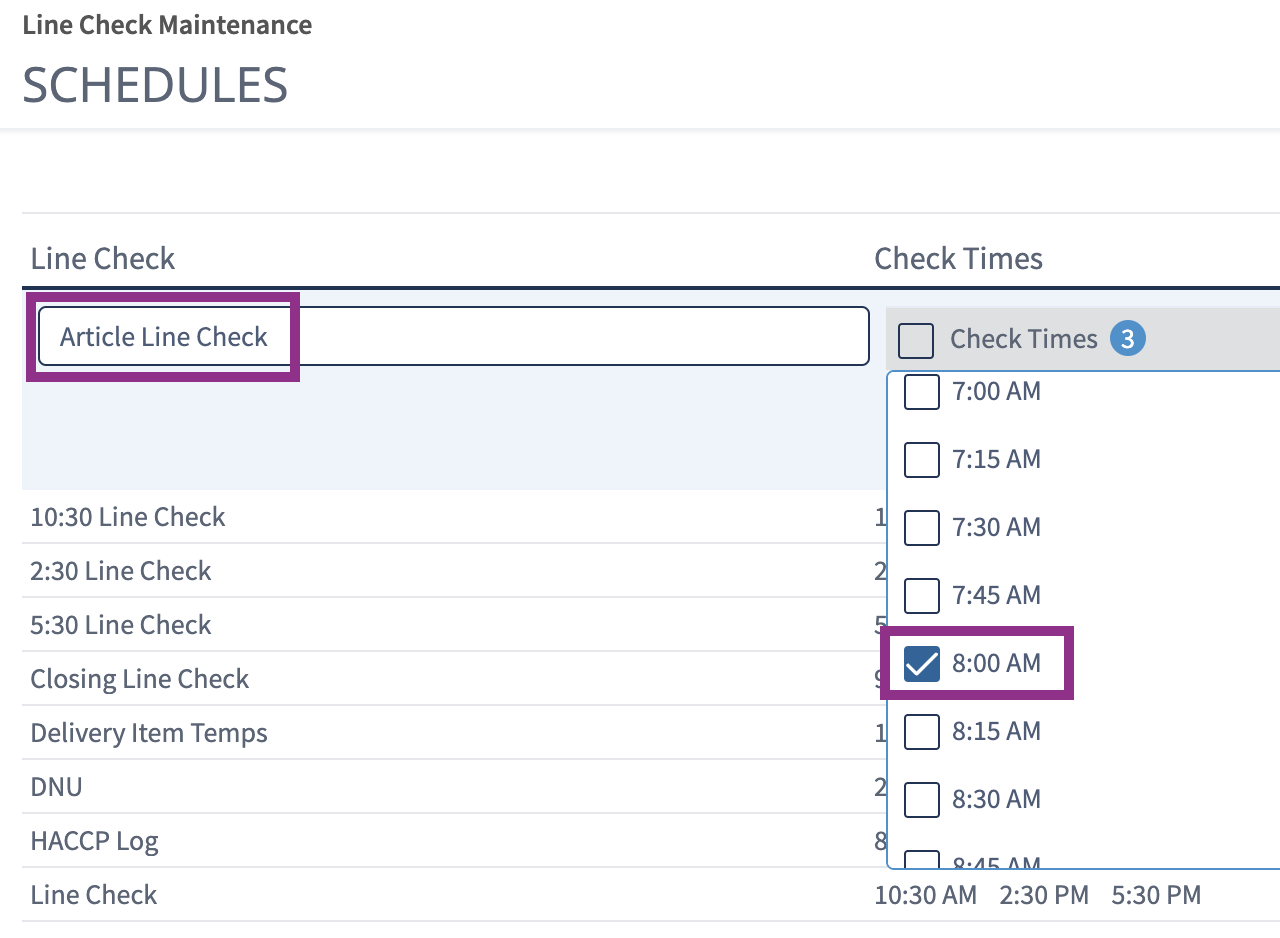
Assign Stores by checking the box next to a store. You can assign one, multiple, or all stores.

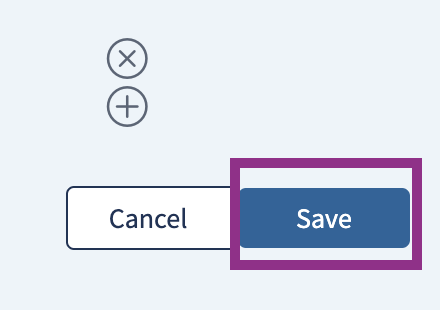
Click Save.
Create & Define Available Items
After a Line Check is created, users can begin adding ingredients. However, before adding ingredients to a line check schedule, users need to define which ingredients are available and can be added to line checks. Let’s check out how to define ingredients and make them available to add to a line check. Begin by navigating to:
Maintenance > Line Check > Line Check Maintenance
Click Manage Items.

Click Add Items.

Define the item’s parameters.
Item Name: Search for an item from the inventory list or use a custom item, such as “walk-in cooler”.
Shelf Life: Enter the shelf life for that item if applicable.
Notes: Provide notes to help users know what they should look for when checking an item.
Allow N/A Entry: Flag the item with the option for N/A. This means users can bypass an entry as long as they select N/A during entry.
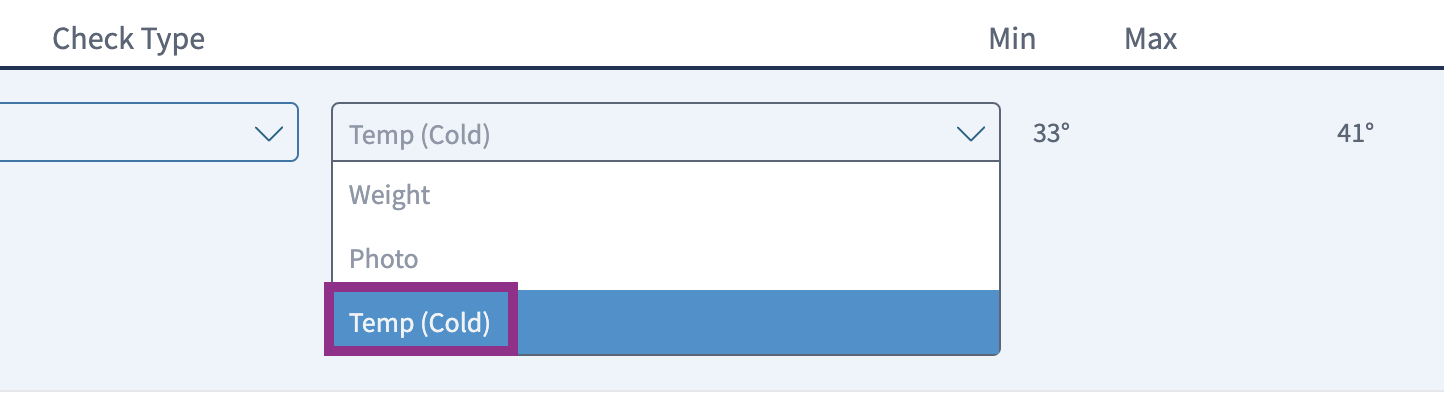
Check Type: Determines how you want that item checked and entered.
Temp Cold & Hot: Temperature range
Count: Individual count
Yes/No: Checkmarks for passing or failing
Weight: In pounds
Photo: Image
Min - Max: The minimum and maximum threshold for an item. For example, acceptable temperature range.
Requires Comment: If an item fails the defined parameters then the user is required to provide a comment. If an item passes, a comment is not required if this box is checked.
Click Save.

When adding an item, users can choose multiple Check Types. This would require the item to pass all Check Types when entering. The user will tap the plus icon to add additional Check Types.

Edit Existing Item
Users can edit existing items and re-define the entry parameters. Begin by navigating to:
Maintenance > Line Check > Line Check Maintenance
Click Manage Items.

Click Edit.

Make the changes.
Click Save.

Add Items to a Line Check Schedule
After a line check is created and items defined, users can add the items to a line check schedule. Begin by navigating to:
Maintenance > Line Check > Line Check Maintenance
Click Edit Items.

Click “+” Item.
Choose an item. You can search for an item in the search bar.

Select the Check Type if there are multiple for the item. If there are no multiples, then the Check Type is automatically selected.
Click Save.

The added item is now assigned to the selected line check. The item count for the line check will appear in the Items column.

Remove Items from a Line Check Schedule
Users can remove an item from a line check schedule. For example, the item is no longer in use. Begin by navigating to:
Maintenance > Line Check > Line Check Maintenance
Click Edit Items.

Click Remove.

Click Remove to confirm.
