What’s New?
Decision Logic’s latest 02/09/2021 version 6.2 product release adds security controls for access to Employee Central Mobile Application through the Employee Roster.
Click here to learn more about the changesHow to Get There and Why
Site Menu Navigation
Operations > Labor Scheduling > Employee Roster
Purpose & Common Uses
The Employee Roster is most commonly used to manage employee’s personal information, the stores and jobs they work, and information required for payroll. This can be used in the following ways:
Labor Scheduling
An employee’s store and job assignments are utilized by the Labor Scheduler to populate the appropriate schedule(s). Once employees are established in the Employee Roster they can be invited to view their schedules through the Employee Central mobile application, available in the Apple Store and Google Play.
Reporting
Scheduled vs Actual (SvA) reporting combines timeclock information from the POS integration and Labor Schedules to present comparative analytics for managers to reduce Labor Cost.
Labor Type Maintenance allows Jobs to be grouped and categorized. These groupings are most commonly used in Custom Reports /wiki/spaces/DCKBA/pages/59965592.
Payroll
While Decision Logic does not act as a payroll provider, we encourage the use of our standardized payroll exports and integrate with third-party payroll providers.
Payroll Reporting
Labor by Job Code
Time Card Detail Reporting
Server Contest Reporting
Payroll Employee Information Exports
Labor SvA


Table of Contents
| Table of Contents | ||||
|---|---|---|---|---|
|
| Info |
|---|
For additional questions or assistance please submit a support ticket by visiting the Decision Logic Help Center. |
How to Use This Page
Page Functions and Definitions
Click-ables
Use the Store Selector dropdown menu at the top right of the page to choose the store, if your profile scope allows you to access more than one.
Select the Employees you wish to view by selecting the them from the desired Employment Status dropdown menu at the top left
Active: This page’s default selection - employees who are not in status Termination Pending or Terminated.
Terminated: Employees who are not in status Active - which leaves Termination Pending or Terminated.
All: All Employees currently assigned to the selected store
Type any part of the a name, position, POS ID / Employee Number, or Phone Number in the Search Bar to narrow the results
Sort any of the first 4 columns in ascending or descending order by clicking on the column header
New Employees are added by clicking the
 Employee button at the top right.
Editing or Viewing Employee Information is achieved by clicking in the row of the Employee in any column except Mobile Access
Print will allow you do print (or save to a destination) the actively displayed list of employees - limitied limited to Name, Primary Position, Phone Number, and Status.
![]() Please use the Seach Bar to find what you are looking for. Web browser Find functionality (CTRL+F) does not yield accurate results.
Please use the Seach Bar to find what you are looking for. Web browser Find functionality (CTRL+F) does not yield accurate results.
Definitions
ID: Decision Logic idenification number - generated sequentially.
Name: First and Last only
Primary Position: Elected in the employee information page, generally assigned as an Employee’s most commonly used Job Code
POS: Employee Number / POS ID, generally the number that the employee uses to clock in and out of shifts through the POS
Phone Number: Entered in the employee information page
 This is the phone number entered in Employee Information, not the phone number used for Mobile Access
Mobile Access: An employee’s state of access/eligibility for the Employee Central mobile app access
Status: State of employment - limited to Active, Termination Pending and Terminated
Permissions
Decision Logic users are granted access to the Employee Roster through Profile Maintenance where users and access to pages are assigned to a profile. Users are additionally configured in the Employee Transaction Permissions page for specific actions regarding Employee Roster functions.


Profile Security & Scope
View grants users view-only access for all employees assigned to the stores in the user's scope. Viewable employee information includes Name, Last 4 of SSN, DOB, Address, Contact Info, Store and Job Assignments, Payrate, and Additional Info in Custom Fields.
Enter grants the additional permission of inviting employees to the Employee Central mobile app.
Change grants the ability to edit employees.
- These security configurations are used in conjunction with Employee Transaction Permissions, seen below.
Employee Transaction Permissions
Specifics of what each user is able to enter or change are established in on the Employee Transaction Permissions page.
These permissions default to unchecked until changed.
Select the user
Check the boxes that apply for this user
Press Save to apply the permissions
Site Menu Navigation: Maintenance > Employee Info > Employee Transaction Permissions

Adding & Changing Employee Information
New Hire
New Employees are added by clicking the ![]() Employee button at the top right.
Employee button at the top right.
| Info |
|---|
New Hire permissions are revoked for companies who opt to add employees to Decision Logic’s Employee Roster through third-party integrations such as
Employee additions, changes, or employement statuses can then be managed through Decision Logic’s On-Boarding and Employee Insert Validation features. |
Existing Employees
To edit an existing employee, click anywhere in the row of the Employee except in the Mobile Access column. Depending on the assigned Profile and Employee Transaction Permissions, one of the two views pictured below will be displayed.
Terminated Employees cannot be edited, regardless of permissions. They would need to be re-hired to edit their information.
If the employee in need of editing (or re-hiring) exists but is inaccessible due to profile scope limitations, contact the store that the employee is assigned to, an above-store level user who has both stores in their scope, or your Decision Logic Administrator.


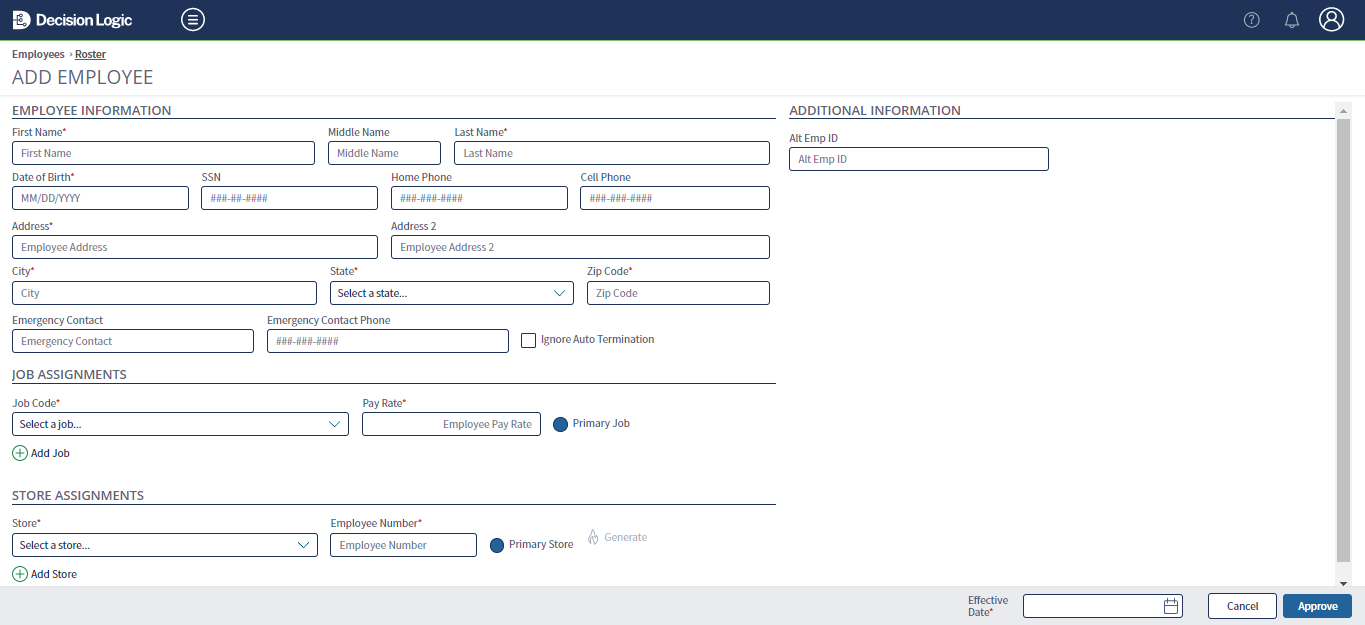
Employee Information
Fields noted with the * red asterisk are required to Approve the Employee.
| Info |
|---|
To avoid duplicate employees (and for integration purposes, quality database management), a unique identifier is declared by your company and required for employees in the roster.
|
SSN
Decision Logic will check that the Social Security Number entered is:
Within the range of valid numbers as defined by https://www.ssa.gov/employer/randomization.html
The roster will exclude area numbers 000, 666 and 900-999.
It does not currently exist for an active employee at another store in your Decision Logic.
Ignore Auto Term box
Hides the employees who have not worked in the last 30 days from the list of “suggested terminations” in Decision Logic’s Payroll Process.
Job Assignments
Employees must be assigned at least one Job Code. If multiple are assigned, the Primary Job must be identified. Depending on how your company utilizes labor or payroll reporting, the Primary Job may be used in overtime calculations.
Job Codes are established in the POS Admin > Labor page. Job Codes are assigned Job Roles in Labor Scheduling maintenance and assigned to Schedules used in Labor Scheduler.
Pay Rate is an employee’s wage per hour. Managers can be identified and configured in POS Admin > Labor to have their hours and labor cost excluded from labor reporting /wiki/spaces/DCKBA/pages/171769895. Salaried Managers are commonly given a Pay Rate of $0.01, but might be given a rate of salary divided by average hours worked. An example of this is below:
Yearly Salary | Weekly Salary | Weekly Hours | Pay Rate |
|---|---|---|---|
$33,600 | $600 | 40 | $15.00 |
Store Assignments
Employees must be assigned at least one Store. If multiple stores are assigned, the Primary Store must be identified. Depending on how your company utilizes labor or payroll reporting, the Primary Store may be used in overtime calculations.
The Employee Number is generally the number that the employee uses to clock in and out of shifts through the POS. One number is generally used for one employee across multiple stores, but can be unique per store.
| Note |
|---|
As a best practice we advise that an Employee Numbers not be re-used |
| Tip |
|---|
Decision Logic offers to create a random number for you! You can use the 🔥 Generate button in this section. |

| Info |
|---|
If you don’t see the Generate button and would like to have it available, please contact your Decision Logic Account Manager. |
| Info |
|---|
The scope of uniqueness required for the Employee Number can be configured by contacting your Decision Logic Account Manager.
|
Additional Information / Custom Fields
The fields in the Additional Information section are established and configured in the Employee Maintenance > Custom Fields page.
Effective Date
When an new employee is added, or any change is made to the Employee’s Information, an Effective Date - the date that the changes are effective - is required before the Approve button is activated.
Effective Date is the first day that the employee clocks in, or clocks in with the changes made.
For example - if an employee’s pay rate increase is only applicable after the end of the week, the effective date would be in the future.
Employees should be added in Decision Logic prior to their first clock in on the POS.
If an employee is added after their first clock-in, be sure to use the effective date of his/her first shift.
![]() If more than 6 days have passed since the date the added employee or changes should have been effective, you will need to resend Decision Logic your POS Labor Data for those dates - either through UDT or End of Day > Run Labor.
If more than 6 days have passed since the date the added employee or changes should have been effective, you will need to resend Decision Logic your POS Labor Data for those dates - either through UDT or End of Day > Run Labor.
![]() Failure to assign the correct effective date will result in no labor/payroll reporting being tied to that employee.
Failure to assign the correct effective date will result in no labor/payroll reporting being tied to that employee.
Employee Central Mobile Access
In the image below, you will see all possible combinations of Mobile Access and Employment Status
Mobile Access Definitions
For Employees with Active Employment Status, the following Mobile Access eligibilities/statuses are defined:
📱 Mobile Access | Definition | Action Options |
|---|---|---|
📱 | Employee can log into Employee Central using their established Username, Email Address, or Cell Phone number | Deactivate - Remove this Active Employee’s access to Employee Central Update - Change this Employee’s Email Address or Cell Phone number |
📱 | * Employee who continues to have - or formerly had - an established Employee Central Username, Email Address, or Cell Phone has been sent an Activation or Update that is pending their confirmation The pending confirmation is also noted in the invitation pop-out | Deactivate - Remove this Active Employee’s access to Employee Central Update- Change this Employee’s Email Address or Cell Phone number again |
📱 🏼 Pending | Employee has been sent an Invitation via Email or Text SMS to create a Username and password, and download the mobile app. The invitation pop-out will also note this: | Resend- Change the entered Email Address or Cell Phone number for the Employee |
📱 ➕ Invite | Employee has not been invited to Employee Central | Send- Send the Employee their first initial invitation to Employee Central |
📱 | Employee does not have access to Employee Central An Employee with Active employment status who has been re-hired, or otherwise deactivated, needs to be 🔹Activated🔹to re-establish their access to Employee Central | Activate - re-establishes their Employee Central access. No action required by the employee Update and Activate - Change this Employee’s Email Address or Cell Phone number then activate them. Employee must accept the update to Email Address or Cell Phone before the account is activated |
For Employees with Termination Pending or Terminated Employment Status, the following Mobile Access eligibilities/statuses are defined:
📱 Mobile Access | Definition | Action Options |
|---|---|---|
📱 ➕ Invite | Employee no longer has Active employment status and was never sent an invitation to establish a connection to Employee Central | 🌀 Re-Hire |
📱 ➖ Deactivated | Employee no longer has Active employment status and their no longer has access to Employee Central | 🌀 Re-Hire |
Re-Hires and Terminations
Re-Hire
Clicking an employee with Status Termination Pending or Terminated will present the following information:
Date Terminated - Effective Date of Termination
Termination Type - Custom Types
Rehire Status - Eligible / Ineligible
Termination Reason - Custom Types
Comments - Max 100 Characters
![]() Termination Type and Termination Reason are established in Employee Maintenance.
Termination Type and Termination Reason are established in Employee Maintenance.
When Re-Hiring an employee follow these steps:
Consideration should be given to the employee information that is presented, which was entered by the terminating Manager.

Press Next
Confirm that the employee’s information is accurate, making changes as necessary
Use the applicable Effective Date

Click Re-Hire
After the employee is rehired, activate their Employee Central account by clicking on the red Deactivated icon in the Mobile Access column of the Employee Roster.
If they are using the same email address or phone number, click the Activate button. They can now use their existing username and password to log into Employee Central. If they have a new email address or phone number, make the needed change and click the Activate button. This sends a verification message to the employee to the updated email address or phone number. The employee will need to verify the change before they can log into Employee Central.
Termination
Select the active employee to terminate
Click ❌ Terminate at the top right of the page
Note that all fields are required

Press Terminate
![]() The Mobile Access for Employees in Termination Pending and Terminated status will immediately be changed to Deactivated upon Termination. Within 15 minutes the employee will be logged out automatically of any active Employee Central sessions.
The Mobile Access for Employees in Termination Pending and Terminated status will immediately be changed to Deactivated upon Termination. Within 15 minutes the employee will be logged out automatically of any active Employee Central sessions.