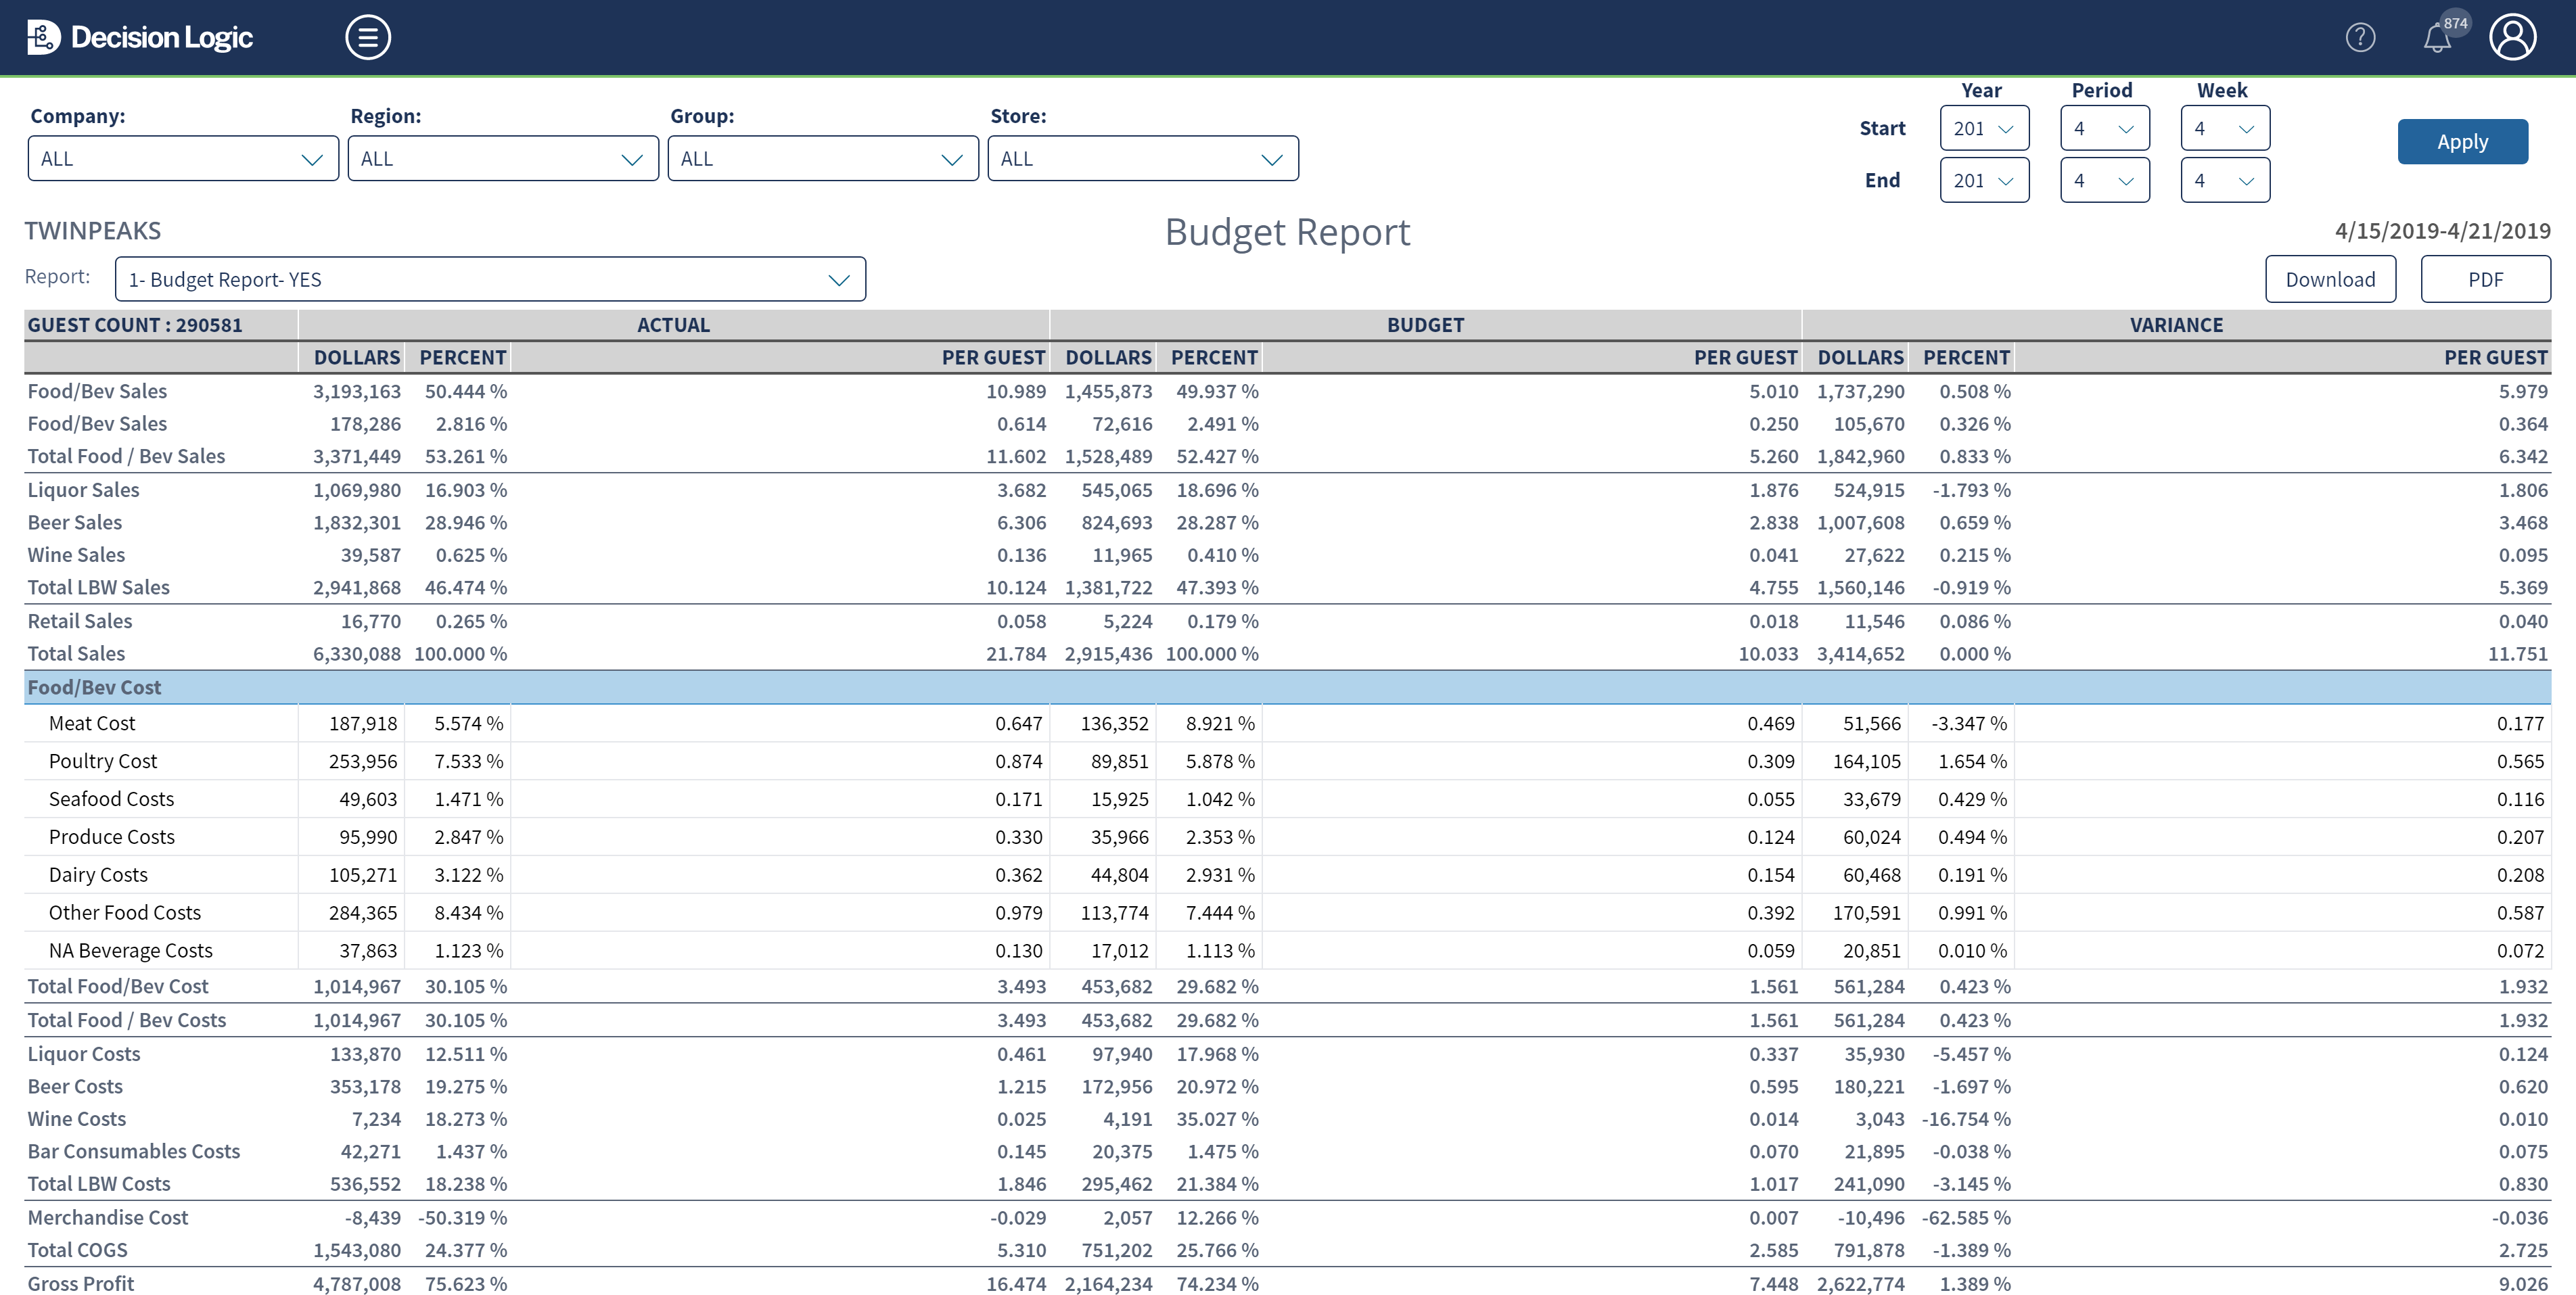
Budget Report V5
Once a budget template is configured in Budget Maintenance, navigate to Reports > Cost and Variance > Budget Report.
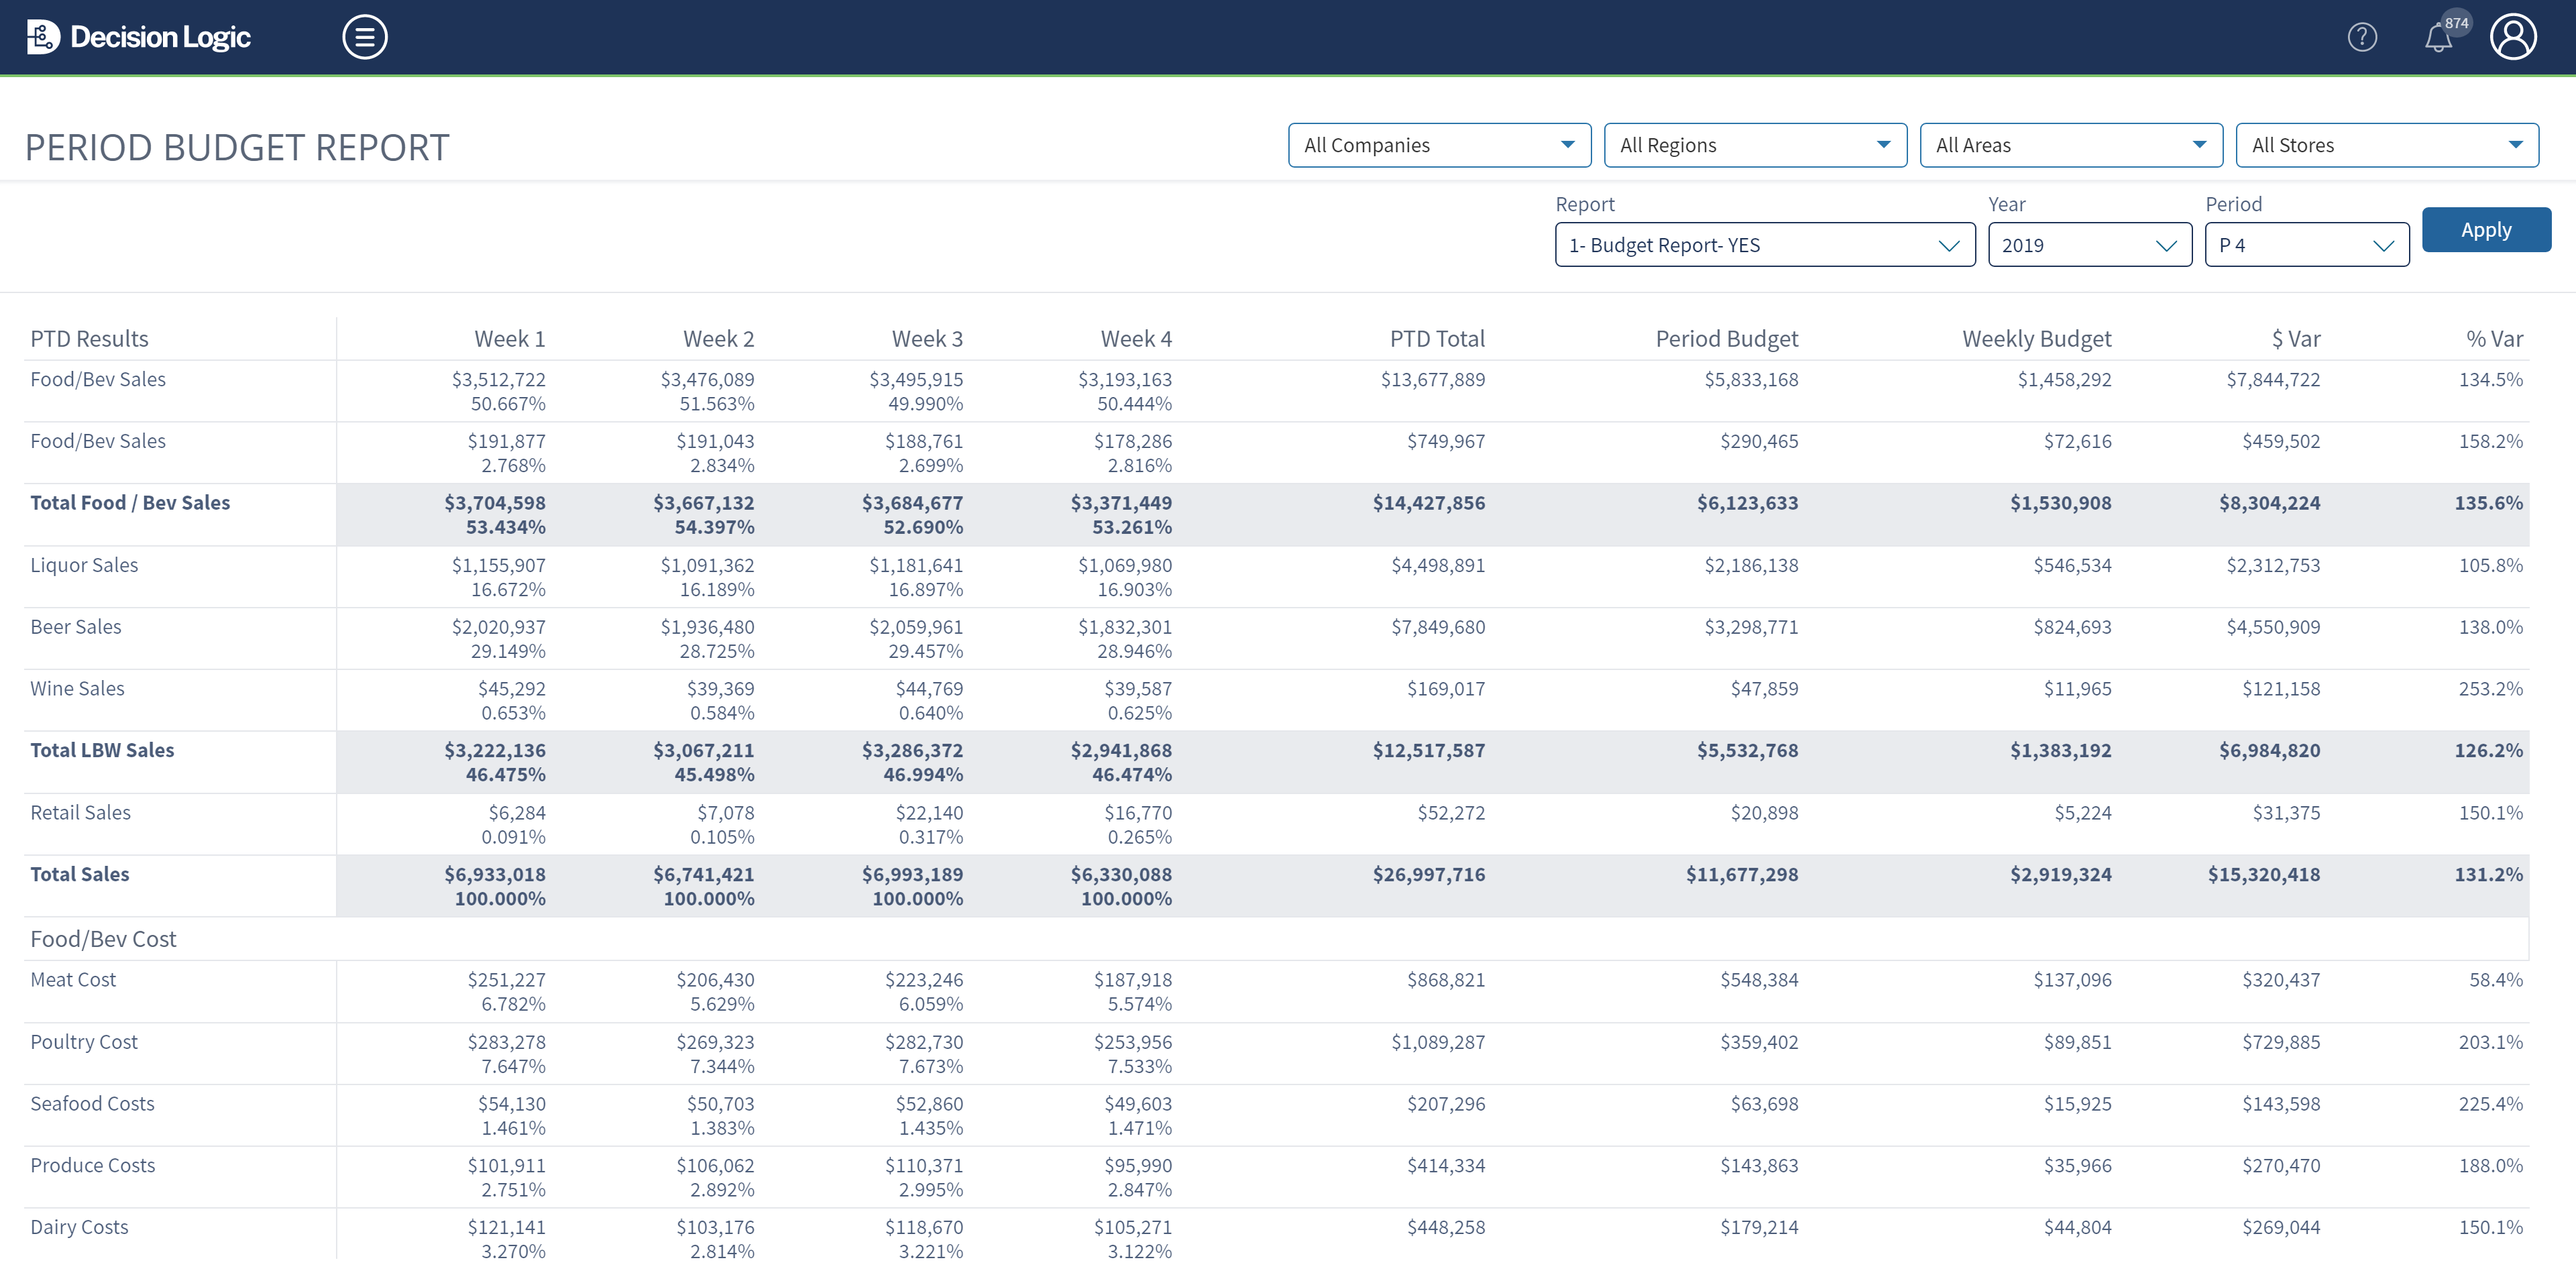
Period Budget V5
Clients on Decision Logic V5 will have access to a Period Budget once a report is built in Budget Maintenance. This view reports the actuals in columns for each week in the period.
PTD Total as the total actuals for the period selected.
Period Budget.
Weekly Budget.
$ Variance.
% Variance.

Budget Budget Report V6
Similar to Period Budget V5, this version is accessible to clients who have updated to Decision Logic V6. See Budget Report - V6 for more information.
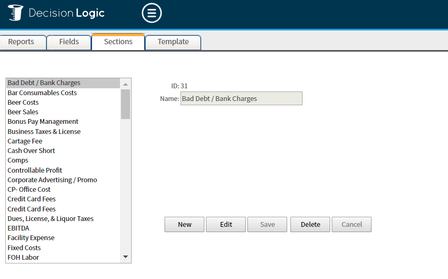
Creating Sections
To configure and customize the Budget Report, navigate to Maintenance > Active Budget Control > Budget Maintenance.
The Sections tab is used to create the headers that will be in your budget template and will be displayed on the Declining Budget Report.
Start by building sections that will be used to build out the template.
Select Sections.
Select New.
Enter a Name for the Section.
Select Save.
Use Edit or Delete to change or delete the section name.
Sections used in Budget Template with Formulas cannot be deleted.
First, remove it from the template before deleting it.
To get started, download the list of commonly used sections to enter into the Budget Maintenance.

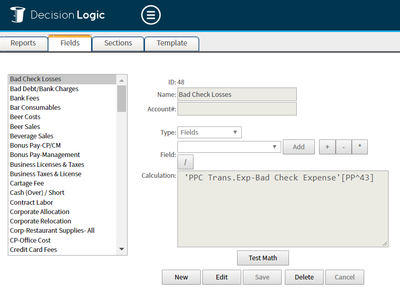
Creating Fields & Calculations
The Fields tab houses all of the line items that will be used for calculations within the declining budget module and displayed on the declining budget report.
Each Field is assigned a Type from the variables listed in the Type: drop-down menu.
Each Field needs to have a calculation defined by using the Field: data types.
After you have created a calculation, the Test Math button can be used to verify if the calculation is correct.
| Info |
|---|
All calculations must follow the proper mathematical formula. |
Defining Fields for your Cost of Goods
In this example, we will show how to set up a common field for calculating Food Cost to see the variance between actual Food Cost and Budgeted Food Cost. The same process should be replicated to calculate all Food Cost as line items for any Cost of Goods account you wish to see on the budget.
| Info |
|---|
Cost of Goods FormulaThe Budget Report is helpful in calculating the true Cost of Goods by always using invoice-based purchases. Depending on your companies configuration, the Cost of Goods report can use Order Based Purchases* which pull price from Orders using Bid File pricing OR Invoice Based Purchases which pull cost directly from Invoices. (Beginning Inventory $ + Purchases $) - Ending Inventory $ (BI + P- EI)/Sales
*If your Cost of Goods uses Order Based Purchases use the COGS Reconciliation page to resolve cost discrepancies between Orders and Invoices to see a balance between reports or consider moving to Invoice Based Cost of Goods. |
To get started building Cost of Goods fields:
Start by selecting the Fields tab under Budget Maintenance.
Select New.
Enter Name: Meat Cost.
Account #
Can be left blank or enter the account number used for accounting systems.
Type
For Cost of Goods Sold calculations, select Type: Cost of Goods
The secondary dropdown will list the available Cost of Goods data points to reference from the COGS Maintenance Page in Decision Logic.
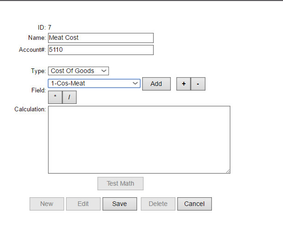

Continued steps:
Select Add to add the data point to the calculation.
In this example, the calculation will be inserted as 'Cost Of Goods.1-Cos-Meat'[T^8].
To add additional data points to the calculation, use the mathematical symbols or hand-key them into the calculation box.
When finished with the calculation, select Save.
Select Test Math to review the results returned by the calculation.


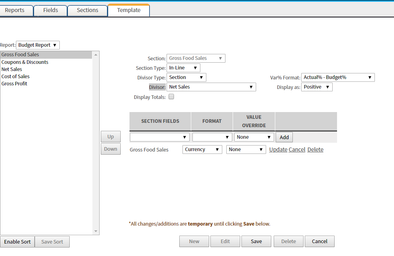
Building a Budget Template
Once you have Sections and Fields created, you can begin to build a template for the Budget Report. Navigate to:
Maintenance > Budget Maintenance > Template
Select NEW, and start by selecting the first section you want to see at the top of your budget report. Most companies start with Sales.
Define Section Type:
There are 3 types of sections you can choose from when deciding how you want the information displayed on the report.
In-Line will return a bold line on the report for each SECTION FIELDS you add to the section. This type should typically only be used for reporting a single SECTION FIELD. When adding more than one SECTION FIELD to an In-Line section type, you will see the Section Name repeated on multiple rows with different values displayed for each SECTION FIELD you added. If you want to see the detail of the Field Name instead, choose Section Type: Detail and add your fields.
Detail will allow you to define specific fields that will then report as individual rows within the Section.
The summary will allow you to add or subtract previously created sections.
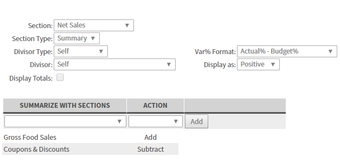
Define Divisor Type
Field Actual.
Field Budget.
Self.
Section.
Define Divisor
Divisors that appear for selection will vary depending on the Divisor Type previously selected.
Display Totals
Check the box to add a total row for the section to the report. This may be redundant depending on the data you are building. Enable or disable this check box as needed.
Var % Format:
Select an option for how you want to see the Variance between Actual and Budgeted amounts on the report.
Actual % - Budget %
(Actual $ - Budget $) / Divisor
Display (Variance) As:
Define how you want the variance between Actual and Budget to appear on the report.
Positive
Negative
Adding Section Fields
For section types: In-Line and Detail, select what fields should be included in the section from the Section Fields dropdown.
Define a Format
Currency
Percent
Select a Value Override Option
None - This option will not override the budget column. Instead, the report will always look at the budget entry to return a value.
Use Actual - This option will use Actual as the Budget amount.

ZeroBudget
This option will use Budget Amount as Actual if there are no Actuals entered or until an actual gets entered.
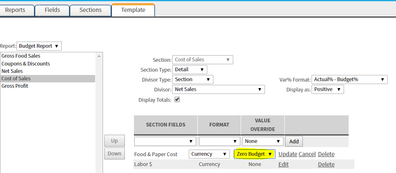

In this example, enter 20,000 on Budget Entry.


Populates the Actual with 20,000 Budget amount until Actuals are entered into Decision Logic.


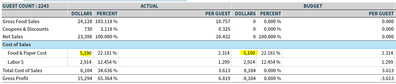
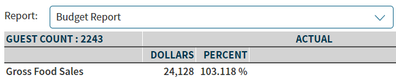
Example of Section Type: In-Line

Reporting example of Section Type: In-Line
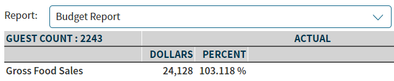
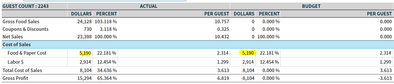
Example of a Section Type: Detail

Report example of a Section Type: Detail


Example of Section Type: Summary
Summarize the Section by adding other sections
Select the Action based on the function the report should do with each section
Add
Subtract
Entering Budget
A user guide is currently under construction. For additional questions or assistance, please submit a support ticket by visiting the Decision Logic Service Center.
Decision Logic allows for the entry of budgets for multiple reports. First, start by creating the budget report and its template. Once those are created, go to Budget Entry or Budget Template Export to download an excel spreadsheet that can be filled out and uploaded into the Decision Logic system.
Budget Entry
The Budget Entry page is designed to allow for adjustments to pre-loaded budgets by Store by Week OR to manually enter budgets for each line item by week.
To begin to enter a budget into Decision Logic, navigate to Maintenance > Active Budget Control > Budget Entry.
V6 Instructions:
Select a Store to bring up the list of available Budget Reports that the store is assigned to under the Report: dropdown.
Select the Report to enter budgets for.
Select the Year.
Select the Period.
Select the Week.
Click Apply.
Enter the Budget Amount $ and press enter or tab.
Select Save to finalize the budget.


V5 Instructions:
Select Company, Region, Group, and Store.
Select Budget Report.
Select Year, Period, and Week.
Click Next.


Enter Budget $.
Click Save.

Budget Template Export
To bulk import a budget for one or multiple stores, navigate to:- V5
Maintenance > Active Budget control Control > Budget Template Export
Select Region, Group, and Store.
Select Company or individual group or store to bring up the list of available Budget Reports that the store is assigned to under the Report: dropdown.
Select the Report to enter budgets for.
Select the week or date range.
For bulk import, select Company or Group and dates from the start of the fiscal year to the end. This way, the template will populate all the weeks and stores needed to upload the budget for the fiscal year.
Fill out the column for the budgeted amount.
To load a bulk import, please submit a support ticket by visiting the Decision Logic Service Center.

Navigate to Maintenance > Budget Maintenance > Budget Entry

Budget Report from the dropdown.
Select the Year and Period.
Click Next.

The file will automatically download to your computer.
| Info |
|---|
Clients using Decision Logic’s V6 platform will need to request the export by submitting a ticket to the Decision Logic Service Center. |
Budget Template Export in Excel

| Info |
|---|
If you do not upload a budget into Decision Logic, but have the store assigned to a budget, you can get Actual Reporting but you will not get Budget reporting until the Budget has been uploaded for each location assigned to the budget. |
Updating the Budget Report
The Process Budget checkbox on the initial landing page of each budget was put in place to provide a faster budget report when running for multiple periods.
For Store Use:
When running the budget for the first time after the week’s end, the budget will auto aggregate. There is no need to select the process budget.
When running for past weeks, if any invoices have been added, you will need to select the “Process Budget” checkbox to re-aggregate the previous weeks.
If the Process checkbox is not selected, the budget report will not aggregate past weeks but instead will pull the last updated budget values.
Store Level Process Budget:


For Administration Use:
The Process Budget checkbox is not available when selecting all stores or multiple stores.
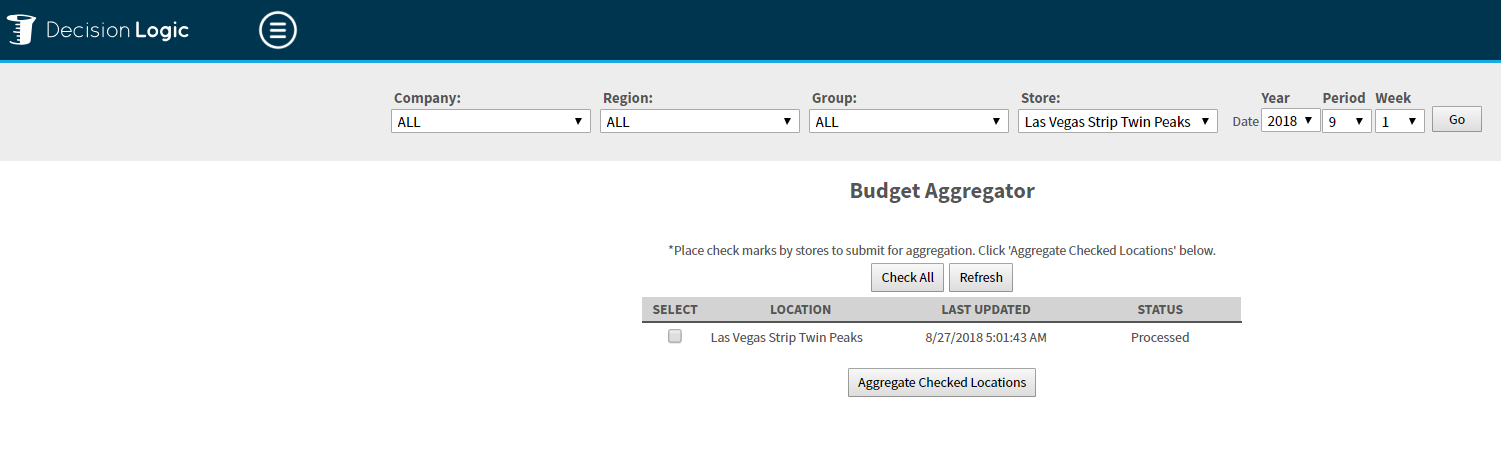
When needing to aggregate multiple stores' budget report please utilize the Budget Aggregator Page under Maintenance > Budget Aggregator.
This is only necessary when changes to your data have been made.
Most Decision Logic clients are on an automatic system that processes the budget aggregator every night for the current week.
If your selected Process Budget and your data did not aggregate for the last 7 days, please submit a support ticket by visiting the Decision Logic Service Center.
Budget Aggregator

| Info |
|---|
You can request that the Budget Auto Aggregate daily by submitting a support by visiting the Decision Logic Service Center. |