The Inventory Sets page is for users who are Decision Logic Administrators. Our new Inventory Sets page makes it easy to create new Inventory Sets and makes it simple to add Products and Stores to existing Inventory Sets.
Create a New Inventory Set
Navigate to Maintenance> Product> Inventory Sets
- Select the Create Inventory Set link in the upper right-hand corner of the page.

- Give your new Inventory Set a Name
- If you are creating a global set of Hot Items for a daily count select the Hot Item Inventory button next to the flame. You will only need one Hot Set for your website.
- Select the Save button.

- You will see a message flash on the page that your Inventory Set has been created and you can see your new Inventory Set on the left-hand side of the page.

- From here you can continue to set up your newly created Inventory Set or maintain an existing Inventory Set.
Add Products to an Inventory Set
- Select an Inventory Set from the list on the left-hand side of the page
- Select the
 button to bring up the searchable list of Products.
 - This list will only have Products that are not currently on the Inventory Set that you are working with.
- You can check the Name check box to add all Product at once.
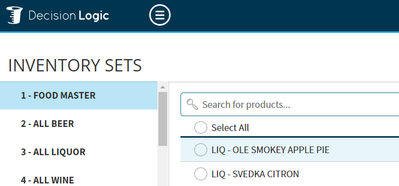
- You can search the list for what you want to find and select items from that filtered list.

- Check the checkboxes for the items that you want to add from that filtered list.
- Select the Add Selected button at the bottom right-hand corner of the page.
- You will see a notification that your Products were added to the Inventory Set and you will be taken to the Product list of the Inventory Set that you are working with.

Remove Products from an Inventory Set
- Select an Inventory Set from the list on the left-hand side of the page.
- Select the
 button to bring up the searchable list of Products
 - This list will only have Products that are currently on the Inventory Set that you are working with.
- You can check the Name checkbox to remove all Products at once.

- You can search the list for what you want to find and select items from that filtered list.
- Check the checkboxes for the items that you want to remove from that filtered list.
- Select the Remove Selected button at the bottom right-hand corner of the page.
- You will be asked to confirm that you want to remove products from the Inventory Set, after confirming you will see a notification that your Products were removed from the Inventory Set and you will be taken to the Product list of the Inventory Set that you are working with.
Assign Stores to an Inventory Set
- Select an Inventory Set from the list on the left-hand side of the page
- Select the 'Stores ( 0 )' tab
- You will see a list of all available stores. Use the checkboxes to add and remove stores.
- Select the header checkbox to add all stores.

- When you make a selection, you will see a Save or Cancel option appear.


- Make your selection, Save, and you will be asked to confirm your selection.
- After verifying that you'd like to make the update to the Stores assignment, you will receive a success notification.
- You will also see an updated Stores count on your selected Inventory Set.
![]() For the purposes of this page in Decision Logic, the term Products is a broad name for a list of Ingredients and Prepped Items.
For the purposes of this page in Decision Logic, the term Products is a broad name for a list of Ingredients and Prepped Items.
![]() To Sort, Rename or Delete Inventory Locations displayed on the Inventory Guide navigate to Maintenance > Product > Inventory Locations
To Sort, Rename or Delete Inventory Locations displayed on the Inventory Guide navigate to Maintenance > Product > Inventory Locations
Table of Contents
For additional questions or assistance please submit a support ticket by visiting the Decision Logic Help Center.