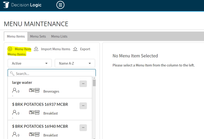
Utilize the Menu Maintenance page to create new menu items and map them to a menu set.
Navigate to Maintenance > Product > Menu Maintenance
Menu Items
Menu Items tab is split into two work areas.
The left side contains menu items, and the right contains the entry field for new menu items, recipes, and menu set mapping.
Add a New Menu Item
Select the Menu Items tab.
Select + NEW MENU ITEM.
Under the Info tab, enter the recipe name and detail.
Select Save.

Required fields:
Menu Item Name: Name of the new menu item being added.
Prep Time: Amount of time the product takes to prep.
Cover Count: Guest count associated with the menu item.
Category: Menu category of the menu item.
Manage Menu Categories
To create new menu item categories or download a list of existing categories, click the Manage Categories button.
Select + Menu Categories to add new categories.
Select Export to download a list of existing categories.
To Edit a Menu Category, click the Manage Categories button, then click on the Menu Category that you want to change.
Enter the new name and click the Save button.
Enter a Recipe
This feature will be disabled for customers using Recipe Book User Manual. |
Select the Menu Item name in the menu list.
The Menu Item name selected will appear at the top of the Recipe tab.
Add an ingredient or Copy a recipe from a Menu Item.
To add an ingredient to a recipe:
Search for ingredient name in the search bar at the bottom of the Recipe tab.
Select the ingredient.
Add the quantity.
Select + to add to the recipe detail.
To copy a recipe from an existing menu item:
Select Copy Recipe From.
Search and select from the menu item name.
After selecting the Menu Item, the ingredients in that recipe will be populated for approval.
Select Copy to add ingredients to a recipe.

After all of the ingredients have been added to the recipe, you will want to confirm that the recipe detail is correct.
Add a Menu Item to a Menu Set
You can add menu items by navigating to Menu Maintenance > Menu Items.

Select a menu item from the Menu Items list utilizing the search function.
Select the Menu Sets tab on the right side of the screen.
The menu item name selected will appear at the top of the Menu Sets tab.
Check the Menu Sets to include the selected menu item.
Add the POS ID and price related to the selected menu item.
Select Save.
Select Cancel to remove changes.
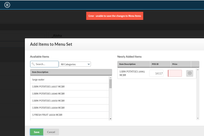
![]() If a duplicate POS ID is added to the menu set a red Item Invalid alert will appear, and the POS ID box will turn red. Add the valid menu number and select save to continue.
If a duplicate POS ID is added to the menu set a red Item Invalid alert will appear, and the POS ID box will turn red. Add the valid menu number and select save to continue.

Edit a Menu Item
To edit a Menu Item previously created:
Use the Search function to select a Menu Item.
Select the Recipe tab to view the recipe detail.
To edit an Ingredient, select the Ingredient.
Edit the quantity.
Select + to save.
Add an Ingredient to a Recipe
Search for the Ingredient name in the search bar at the bottom of the Recipe tab.
Select the Ingredient.
Add the quantity.
Select + to add to the Recipe detail.
Archive a Recipe
The user has the ability to archive menu items that are no longer in use.
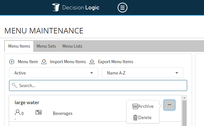
To archive an item, hover over the Menu Button and select Archive.
The Standard view of the Menu List does not include archived items.
To view archived items, check Show Archived.


Recipe Indicator
The user can also determine whether a Menu Item has a recipe by utilizing the Recipe Column.
The Recipe Column contains a check mark if the Menu Item has a recipe created.
Menu Sets
The Menu Sets tab allows users to create new Menu Sets, attach Menu Items, and manage existing Menu Sets.
The Menu Set tab is located in the left corner of the page. The left side of the screen contains Menu Sets created.
The right side of the screen allows the user to add Menu Items and add or remove stores to or from a Menu Set.
A store is required to be assigned to a Menu Set to get Menu Mix reporting. |
How is Menu Item Price is used?
Menu Maintenance > Menu Items > Recipe will show Cost using the current market price and multipliers.
Because maintaining menu item price is a manual process in Decision Logic, there are only 2 reports that use Menu Item Price:
Menu Profitability
Plate Cost
All other Decision Logic Sales, IvA, and Cost of Goods reporting use Sales from the Menu Item ID based on the Department ID they are assigned to.
If you do not update menu item price in Decision Logic, all reports, aside from the two above, will be accurate for total menu sales. |
Price Tiers
To manage this you would need to create multiple Menu Sets in Decision Logic for each price tier and maintain prices across each tier.
Rules:
A menu item id/recipe cannot exist on 1 menu set with different prices.
A menu item id/recipe can exist on multiple menu sets.
Different POS IDs.
Different Prices.
Be sure to only assign stores to the menu set that has their price tier.
Do not assign stores to multiple menu sets with the same POS IDs.
This will result in double reporting of that menu item sold.
Create a separate menu set with items that are an exception to the standard or default menu set.
Only assign stores who use the exceptions to that Menu Set.
Menu Item Price Updates
Currently, we do not automatically update pricing into Decision Logic for Menu items.
Pricing would need to be updated manually per menu item.
Adding a New Menu Set
Select + NEW MENU SET.
Enter the Menu Set name.
Select Create.
Adding Menu Items to a Menu Set
There are two ways to add Menu Items to a Menu Set.
The second option is to add Menu Items from the Menu Set tab:
To add Menu Items to a menu set:
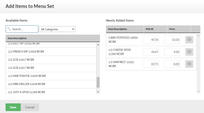
Hover over the Menu Button and select Add Menu Items or + Add Items
Utilize the Search function to find available items.
The available items list will only contain items that are not already added to the Menu Set.
Select the items to add to the Menu Set.
Any items selected will drop to the right side of the page.
To remove from the list, select X.
Add the POS ID and Price.
Select Save.
A duplicate POS ID will not be added to the Menu Set. |

Edit a POS ID or Price:
Select the item, correct the appropriate field, and select + to save or select the trash can to cancel.
To remove an item from a Menu Set, select X.
Mapping stores to a Menu Set
To map stores to a Menu Set:
Select Menu Set.
Select the Stores tab.
Check stores to add to the set.
Select Save.
To remove a store, un-check the box and select Save.

Bulk Menu Item Import
Step 1: Create Menu Categories in Decision Logic under Menu Maintenance
Menu Item Categories will be used for Menu Mix reporting grouping.
They should mirror your Point of Sale Menu Item categories for ease of p-mix validation.
If your Point of Sale is not categorized, use Decision Logic Menu Item categories to re-group your menu items into categories.
Select + Menu Item to activate the Menu Item Panel
Select Category
Select Manage Categories
Select + Menu Category to add categories.
Enter Category Name
Select Save or select the Trash Can icon to delete
Categories that have existing menu items assigned cannot be deleted. |
Select Export Menu Items to export an existing list of Menu Items
Step 2: Create Menu Items
Select Import Menu Items
Click to Download to import the data template.
In a single .csv with the general format, define Menu Item Description, Cover Count, Prep Time, and Category
Save the file to your computer.
Select Import Menu Items.
Drag and Drop the file to import Menu Items.
Step 3: Import Menu Items to a Menu Set
Create Menu Set per concept or price tier.
Select Import Menu Items.
Download the template.
In a single .csv with the general format, define Menu Item Description, POS ID, and Price.
Import this list into the Concept Specific Menu Set in Decision Logic.
Deleting a Menu Item, Deleting a Menu Set
For Menu Items, you can make them inactive, however, that will not remove them from reporting (such as Plate Cost).
You have to remove them from the Menu Set to remove them from reporting.
If you do remove them from the Menu Set, you will lose all historical reporting which can affect your IvA historical reporting on ingredients.
By design, on most pages in Decision Logic, our system does not allow you to delete data that has historical reporting.
We do not recommend deleting Menu Sets because you will lose the historical data.
If you do want to delete any data that has a history, you will want to first submit a support ticket with the help desk by visiting our Customer Support Portal
Also important to note that you also have the ability to export your Menu Set items if you need to get a full list of Menu Items.
If you have any questions about deleting anything from the system, it is recommended that you first consult with your account manager or the Service Center so that we can discuss the irreversible consequences. |
Menu Maintenance FAQs:
What can I do if I have a Black Screen on my Menu Set tab?
This can be corrected by resetting your browser's zoom to 90% on a Windows computer or using cmd + [-] on a Mac.
© 2023 Knowledge Management Systems, LLC. Decision Logic. All Rights Reserved.
Table of Contents
For additional questions or assistance, please submit a support ticket by visiting the Decision Logic Service Center. |